Plasmid vectors: journey’s end
In our first post, The Mystery Vector, we described how to recover lost or damaged plasmid vectors and outlined strategies for identifying unknown vectors. In The Culture Wars we discussed how to optimize culture conditions for growing up large quantities of plasmid vector in E. coli. – and now, it is time to discuss the end of the plasmid vector’s journey – purification and quantification.
The ready-made commercial kit is your friend, not a foe
The use of commercially available kits is highly recommended when isolating and purifying plasmid vectors. Typical “miniprep” kits provide around 20 µg and “maxiprep” kits deliver up to 500 µg of high-quality DNA. These kits come with all required reagents and the associated protocols take a fraction of the time compared to traditional methods.
Moreover, they avoid the use of toxic chemicals such as phenol, saving additional time and costs associated with disposing of hazardous wastes. Most importantly these kits provide very high purity DNA when compared to other traditional methods for plasmid extraction and purification. While it is true that these kits often yield significantly less DNA than traditional methods the gains in efficiency and purity easily compensate for this in our experience.
The first few steps are deceptively simple
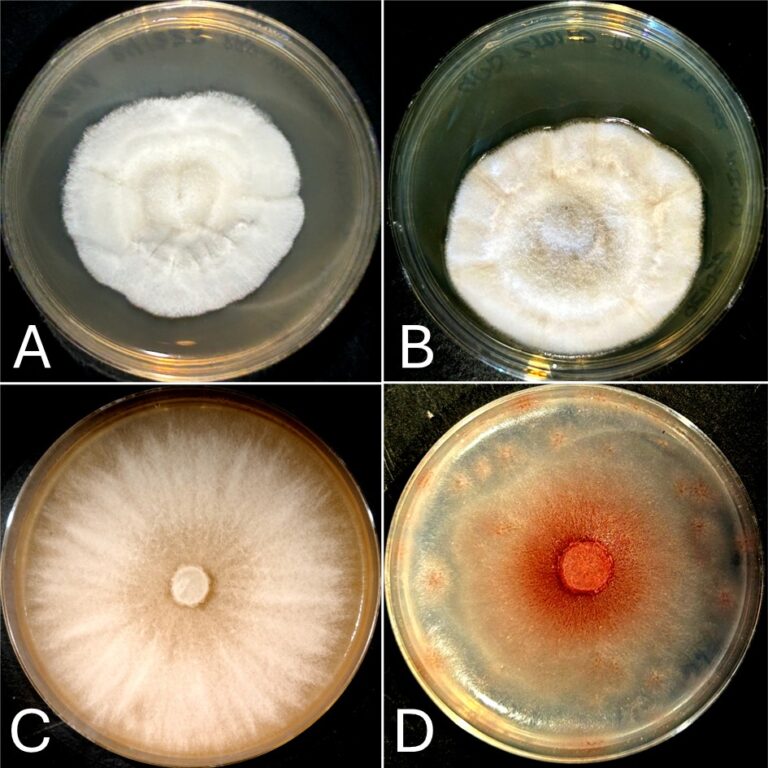
Small-scale plasmid DNA “miniprep” kits and traditional protocols almost universally begin with alkaline lysis of bacterial cells followed by acid precipitation of genomic DNA and proteins, leaving the plasmid DNA in solution. These first few steps of the protocol may seem straightforward, but it is these steps that are the most common point in failure to obtain high-quality plasmid DNA. Pelleted bacteria (Figure 1A) are resuspended in a solution typically containing Tris-HCl buffer, EDTA, and RNase A (Figure 1B).

The main purpose of this solution is simply to ensure there are no lumps or clumps of bacteria to allow even and efficient lysis upon addition of the second solution. An important ingredient in this solution is RNase A. RNase A will quickly degrade the cellular RNA of the bacteria and prevent it from contaminating the final plasmid DNA solution. Next, a solution of sodium hydroxide and SDS is added to break open the bacterial cell wall and release the contents – these include RNA, protein, bacterial genomic DNA, and, of course, plasmid DNA.
Shake gently or risk shearing the genomic DNA
It is critical that after addition of the second solution the mixture is agitated very gently and slowly, and only until the solution turns clear and viscous (Figure 1C). It is essential that the mixture never be forcefully shaken or vortexed at this stage, as this will result in shearing of genomic DNA. The clever trick of the alkaline lysis method is the ability of the acidic third solution to selectively precipitate proteins, SDS, and large genomic DNA while leaving smaller plasmid DNA in solution.
If the genomic DNA has been sheared by rough handling during lysis, it will remain in solution after addition of the third solution and will end up as a contaminant in the DNA preparation. Once the third solution has been added it is important to mix thoroughly but gently, all viscosity should disappear and a clear solution with a fine curdy precipitate should remain (Figure 1D). The remaining steps should be carried out exactly as the instructions included in your kit describe. Many kits recommend heating the final elution buffer to 50 – 60 °C prior to elution. We do this routinely and find that it does substantially increase yield.
Purity assessment and indicators
Measurement of the quantity and purity of DNA is most commonly and routinely carried out via UV-Visual spectrophotometry. Measure your DNA according to the directions supplied by the manufacturer of your spectrophotometer, and always blank using the exact same solution in which the DNA is dissolved. When measuring DNA by UV-Visual spectroscopy there are three parameters of importance: the absorbance at 260 nm, and the A260/A280 and A260/A230 absorbance ratios. On modern spectrophotometers, the A260 is used to calculate and directly display the concentration of DNA in either mg/mL, µg/mL, or, most commonly, in ng/µL.
Purity assessment by UV-Visual spectroscopy relies on the ratios between the absorbance at 260 nm and that at either 280 nm or 230 nm. To help understand how these indicators of purity work we’ll refer to Figure 2. This graph shows normalized spectra of pure DNA (thick black line) alongside spectra for three common contaminants of DNA solutions: free nucleotides (dNTPs, blue line), phenol (orange line), and protein (red line). The spectrum of pure DNA has a maximum at 260 nm and tapers somewhat broadly on either side, reaching about half its maximum value at 230 and 280 nm with the optimum A260/A280 ratio being 1.8 and the optimum A260/A230 ratio being 2.2. It is important to note here that the optimum A260/A280 ratio is often stated to be 2.0 for pure DNA, though it is in fact 1.8.
Typical impurities and contaminants
Let us now turn to the impurities often found in DNA preparations. Free nucleotides (Figure 2, blue line), as well as RNA, also have an absorbance maximum of 260 nm like DNA, however, as Figure 2 shows, the peak is much steeper than that for DNA and the absorbance at 230 and 280 is relatively lower. For the spectrum shown, the A260/A280 ratio was 6.4 and the A260/A230 ratio was 5.2. In practice, this means that DNA samples with both high A260/A280 and A260/A230 ratios are likely to be contaminated with free nucleotides, or in the specific case of plasmid vectors, residual RNA.

In the case of phenol (Figure 2, orange line), a contaminant often left behind by traditional plasmid isolation protocols, there is a peak at approximately 270 nm which falls off rapidly on both sides, giving an A260/A280 ratio of 2.1 and an A260/A230 ratio of 2.5. In practice though, when phenol is present in a solution of DNA this has the effect of dramatically lowering the A260/A280 and raising the A260/A230, therefore a low A260/A280 with a high A260/A230 implies contamination with phenol or similar compounds.
The final common contaminant of plasmid vector DNA preparations is protein (Figure 2, red line). Protein exhibits two absorbance maxima, one at around 280 nm and one at 230 nm. This occurs due to absorbance at 280 nm by aromatic amino acid residues such as phenylalanine, tyrosine, and tryptophan; and absorbance at 230 nm by the protein peptide backbone. The A260/A280 ratio of the spectrum shown is 0.7 and the A260/A230 is 0.6. Protein therefore has the effect of lowering both the A260/A280 and A260/A230, and a DNA solution with low values for both these numbers is likely contaminated with protein.
In addition to these contaminants, plasmid vector DNA is often contaminated with substances such as acetate or guanidium from various solutions used in its extraction, isolation, or precipitation. These materials absorb at 230 nm but not at 260 nm or 280 nm, so these contaminants result in abnormally low A260/A230 values coupled with typical A260/A280 ratios. Keep in mind that EDTA also absorbs at 230 nm, so make sure if your DNA is dissolved in a buffer containing it that you use the same buffer for blanking the instrument prior to measuring your sample.
Contaminant sources and acceptable ranges
In general, DNA with a A260/A280 of 1.7 to 2.0 and an A260/A230 of 2.0 – 2.5 is acceptable for most uses, so no need to throw it out if your numbers are a bit off. When values exceed these ranges though, the information provided here and summarized in the table below can help in identifying the source of the contaminant. Keep in mind though that DNA can be contaminated with more than one of these at a time. If you do find that your DNA is impure, don’t throw it out. Running it through one of the many excellent commercially available DNA cleanup kits will generally solve the problem and salvage your DNA preparation.
| CONTAMINANT | A260/A280 | A260/A230 |
| nucleotides, rna | HIGH | HIGH |
| phenol | LOW | NORMAL |
| protein | LOW | LOW |
| Acetate, guanidium, edta | NORMAL | LOW |
In short, use a kit and read the directions
In summary, the single best thing you can do to improve the quality and reliability of your plasmid vector preparations is to use a commercially available kit. These kits are economical, come with all needed materials, and provide very high-quality DNA with great reliability. Applying the additional tips described above will ensure you obtain the best plasmid vector DNA preparations possible so you can efficiently move on to applying them in your research. For larger amounts of plasmid vector DNA (1 – 10 mg), Proxima Research and Development’s plasmid vector services would be a great option. Simply deposit your vector with us and for less than the cost of doing it yourself we can provide 1 to 10 mg of high purity, sterile, endotoxin-free, transfection-grade plasmid vector, including verification by Sanger or NGS sequencing.
If the kit isn’t working for you, call Proxima
Plasmid vectors are a fundamental tool in modern biotechnology research, and we hope this three-part blog series has helped you to understand how to identify, propagate, purify, and quantify plasmid vector DNA. Please feel free to contact us (contact@proxima-rd.ca) or leave a comment below to learn more about how Proxima’s expertise can help you. Until then, vector on!